Trending Cinematic Ai Video Editing – Friends, these days, videos are trending on social media that are so sophisticated that it is hard to believe they were created using AI. They appear completely realistic. One such video is currently going viral; it features a scene created with the help of AI. While the beginning of the clip consists of actual footage, the latter part—which was generated and added using AI—looks incredibly realistic and highly creative. So, friends, if you too wish to create such a trending AI video, simply follow this article. Today, I will walk you through the entire process for replicating this viral AI video edit, enabling you to easily create your very own videos just like it. Let’s get started—follow along with the article!
Details Of Trending Cinematic Ai Video Editing
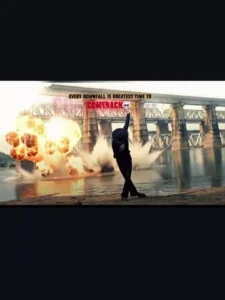
Take a look at this video edit; the realism achieved here is truly remarkable. The video begins as a standard landscape clip, but moments later, a beat-synced edit kicks in. With every beat, a massive explosion erupts in the background—much like what you would see in a movie. However, this isn’t real; it was created using AI. The truly amazing part is that the AI has generated the video so flawlessly that, at first glance, it is absolutely impossible to tell that it was created by artificial intelligence. Furthermore, the video has been enhanced with a distinct cinematic look. So, friends, if you want to create a video like this yourself, you first need to understand the process. Let me walk you through it in the following paragraphs.
Editing Process For This Ai Video
To create this AI video, you need to follow two simple steps. First, you will need to record a video clip. Choose a suitable location—ideally one where a bridge or a river crossing is visible in the background. Such a video would be absolutely perfect. Next, take a screenshot from the very end of that video clip. You will then use this screenshot to generate a video, which will be created by the AI. Therefore, to proceed with making the AI video, you first need to familiarize yourself with the specific AI tool. We will be using Google Flow AI to create this video, so you should also learn how to utilize the Google Flow platform. The process involves adding an image along with a video prompt to generate the final video. I will explain this in further detail in the next paragraph.
Use the uploaded image as the base reference.
Strictly preserve the subject exactly as it is: same face, same identity, same body, same pose, same clothes, same hairstyle. Do not modify, enhance, replace, or distort the person in any way.
Apply changes to the background only: generate a large, realistic explosion behind the subject that naturally fits the existing environment (any location such as road, city, room, field, etc.).
Add fire, smoke, shockwave, debris, dust, and light effects only in the background. Ensure the explosion lighting matches the scene.
The subject must remain completely untouched and stable, with no movement, no blur, no deformation.
Cinematic slow motion, ultra realistic VFX, natural lighting integration, depth of field, 4K quality, action movie style.
strict identity lock, no face change, no outfit change, background only modification
How To Generate Your Video
So friends, to generate such AI videos, we need to follow a few simple steps. Which I’ll explain in this article. First, click the “Generate Video” button. This will take us directly to the Flow AI website. Log in with your email address. Then, click the “New Project” option. There’ll create a project. Click the “Text” option on the dashboard below, then select “Frame” to “Video.” Then, click the “+” icon to add an image and type some text in the box I’ve provided below the image on my site. Copy this prompt and paste it there. Then, click the “Generate” button. After a few moments, our video will be ready, and it will look realistic. This is how you’ll create your video.
Conclusion
So, in this way, you can easily generate a video from your photos using Flow AI. Now, for the final editing, simply open any video editing application; first, add your original video, and then add the AI-generated video. You can also add a transition between the two, if you wish. Just like that, your final video will be ready. You can perform this video editing process with ease. We hope you enjoyed this article and have successfully learned how to create these trending AI videos.